New Skill Testing Platform For 6 Most In-Demand Cybersecurity Jobs
Building a security team is a necessity for organizations of all industries and sizes. It makes selecting the right person for the job a critical task in which testing candidates' domain knowledge is a core component of the hiring process. A common practice is for each organization to put together a dedicated set of questions for each role. Today, Cynet launches the Cybersecurity Skill Tests
A step by step lab based mini course on analyzing your car network
I wanted to learn about hacking cars. As usual I searched around the internet and didn't find any comprehensive resources on how to do this, just bits and pieces of the same info over and over which is frustrating. I am not a car hacking expert, I just like to hack stuff. This mini course will run in a fully simulated lab environment available from open garages, which means in 5 minutes from now you can follow along and hack cars without ever bricking your girlfriends car. Since you obviously wouldn't attack your own Lambo, totally use your girlfriends Prius.
Below are the topics covered in this blogseries so you can decide if you want to read further:
Whats covered in this car hacking mini course:
Setting up Virtual Environments for testing
Sniffing CAN Traffic
Parsing CAN Traffic
Reverse Engineering CAN IDs
Denial of service attacks
Replaying/Injecting Traffic
Coding your own CAN Socket Tools in python
Targeted attacks against your cars components
Transitioning this to attacking a real car with hardware
The first thing we are going to do before we get into any car hacking specifics such as "WTF is CAN?", is get your lab up and running. We are going to run a simple simulated CAN Bus network which controls various features of your simulated car. Its better to learn by doing then sit here and recite a bunch of car network lingo at you and hope you remember it.
I also don't want you to buy a bunch of hardware and jack into your real car right away. Instead there are options that can get you started hacking cars RIGHT NOW by following along with this tutorial. This will also serve to take away the fear of hacking your actual car by understanding what your doing first.
Video Playlist:
Setting up your Lab:
First things first, set yourself up with an Ubuntu VMware install, and load it up. Optionally you could use a Kali Iinux VM, however, that thing drives me nuts with copy paste issues and I think Kayak was giving me install problems. So support is on you if you would like to use Kali. However, I do know Kali will work fine with OpenGarages virtual car.. So feel free to use it for that if you have it handy and want to get started right away.
Install PreReq Libraries:
Once you load this up you are going to want to install CAN utilities and pre-requisite libraries. This is really easy to do with the following Apt-get commands:
Once this is done we can startup the simulator by changing directories to the downloaded repo and running the following 2 commands, which will setup a virtual CAN interface and a simulator GUI Cluster:
Run the setup Script to get the vcan0 interface up:
root@kali:~/ICSim# ./setup_vcan.sh
root@kali:~/ICSim# ./icsim vcan0
On a new terminal tab we will open up our simulators controller with the following command,
root@kali:~/ICSim#./controls vcan0
Note: that the controller must be the in-focus GUI screen to send keyboard commands to the simulator.
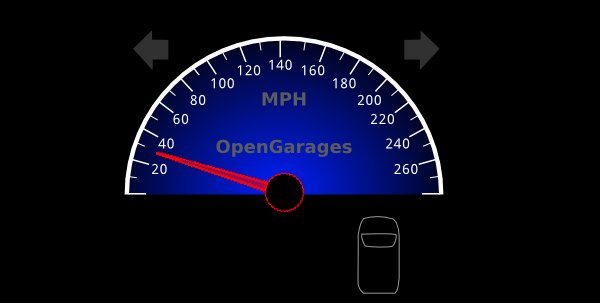
How to Use the Simulator:
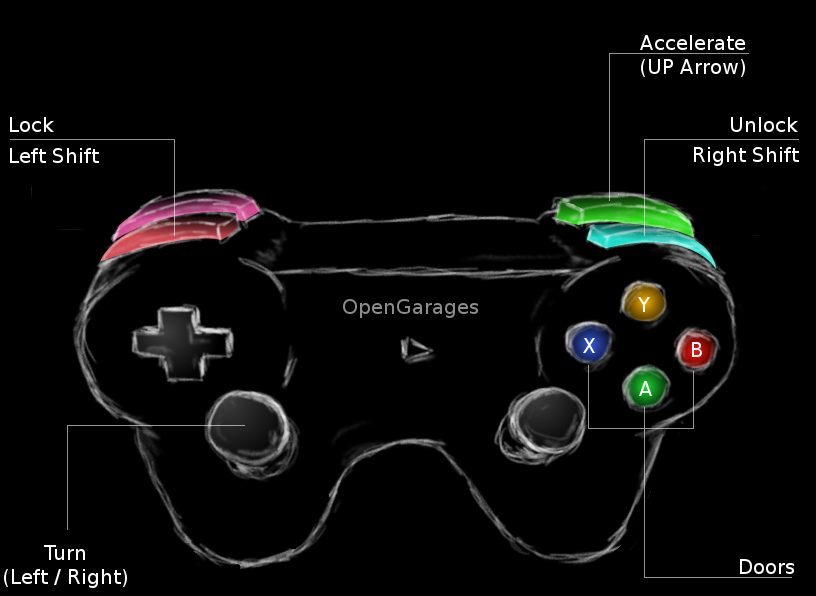
The simulator has a speedometer with Right and Left turn signals, doors etc. Below are the list of commands to control the simulator when the Control panel is in focus. Give them each a try and note the changes to the simulator.
Up and Down keys control the gauges clusters speedometer
Left and Right keys Control the Blinkers
Right Shift + X, A or B open doors
Left Shift + X, A or be Close doors
Try a few of the above commands for example Right Shift +X and you will see the interface change like so, notice the open door graphic:
Awesome, thanks to OpenGarages you now you have your very own car to hack
Notice in the setup commands above we used a VCan0 interface. Run Ifconfig and you will now see that you indeed have a new network interface that speaks to the CAN network over VCan0.
ficti0n@ubuntu:~/Desktop/ICSim$ ifconfig vcan0
vcan0 Link encap:UNSPECHWaddr 00-00-00-00-00-00-00-00-00-00-00-00-00-00-00-00
Car networks run on a variety of protocols most prevalent being CAN. You can think of a CAN Bus like an old school networking hub where everyone can see everyone elses traffic. This is true to some extent although you may not see all of the cars traffic if its not connected to that particular bus your plugged into. You can think of CAN traffic kind of like UDP in that its send and forget, the main difference being parts of the CAN bus network don't actually have addresses and everything runs off arbitration IDs and priorities. Thats enough background to get you doing rather then reading.
With a little knowledge out of the way lets check if we can see our CAN traffic from our virtual car via the CanDump utility, which you installed as part of CanUtils package above. Using the following command on the vcan0 interface our simulator uses you can view a stream of traffic:
ficti0n@ubuntu:~/Desktop/ICSim$ candump vcan0
Above we can see a bunch of CAN frames, and if we perform actions on the vehicle we will see changes to data values in the CanDump output.However this may happen very fast, and we may not be able to see if for example we unlocked our simulators door. This is because things are changing constantly in the cars IDLE state. One single value changing may not stand out enough for us to take notice or may scroll so fast we cant see it.
Capture and Replay CAN Actions:
One option would be to perform an action and replay it, we should see the actions happen again in the replay if the traffic for the action we recorded is on the same bus network our device is plugged into. There are loads of networks within a car and its not guaranteed our network tap for example an OBD2 port plugin is connected to the same network as door we opened.Or the door may not be connected to the network at all depending on your car and its age or how its configured.
Replaying dumps with CanPlayer:
Another useful tool included with CanUtils package is CanPlayer for replaying traffic. If the functionality we are trying to capture is on the same Bus as the adaptor plugged into the car, or in this case our Virtual CAN interface, we can use CanDump to save traffic to a file. We then use CanPlayer to replay the traffic on the network. For example lets run CanDump and open a door and then replay the functionality with CanPlayer.
Lab 1 Steps:
Run CanDump
Right Shift + X to open a door
Cancel CanDump (ctrl+c)
Left Shift + X to close the door
Run can player with the saved dump and it will replay the traffic and open the door
Recording the door opening:(-l for logging)
ficti0n@ubuntu:~/Desktop/ICSim$ candump -l vcan0
Replaying the CanDump file:(use the file your can dump created)
Nice, so if all went well you should see that your door is now open again. If this did not happen when attacking a real car, just try to replay it again. CAN networks are not like TCP/IP, they are more like UDP in that you send out your request and its not expecting a response. So if it gets lost then it gets lost and you have to resend. Perhaps something with higher priority on the network was sending at the time of your replay and your traffic was overshadowed by it.
Interacting with the Can Bus and Reversing Traffic:
So thats cool, but what about actually understanding what is going on with this traffic, CanDump is not very useful for this, is scrolls by to quickly for us to learn much from.Instead we can use CanSniffer with colorized output to show us the bytes within packets that change. Below is an example of CanSniffer Traffic:
You will see 3 fields, Time, IDand Data. Its pretty easy to figure out what these are based on thier name. The most important part for our usage in this blog are the ID and the Data fields.
The ID field is the frame ID which is loosely associated with the device on the network which is effected by the frame being sent. The ID to also determines the priority of the frame on the network.The lower the number of the CAN-ID the higher priority it has on the network and more likely it will be handled first.The data field is the data being sent to change some parameter like unlocking a door or updating output. You will notice that some of the bytes are highlighted RED. The values in red are the values that are changing during the idle state you are currently in.
Determine which ID and Byte controls the throttle:
So with the terminal sniffing window open put the simulator and the controller into the foreground, with the controller being the window you have clicked and selected.Pay attention to the CanSniffer output while hitting the UP ARROW and look for a value that was white but is now Red and increasing in value as the throttle goes up.This might take you a few minutes of paying attention to whats going on to see.
The following 2 pictures show ID 244 in the IDLE state followed by pressing the up button to increase the speed. You will notice a byte has turned red and is increasing in value through a range of HEX values 0-F. It will continue to enumerate through values till it reaches its max speed.
The byte in ID 244 which is changing is the value while the throttle is engaged, so 244 associated in some way with the increasing speed. The throttle speed is a good value to start with as it keeps increasing its value when pressed making it easier to spot while viewing the CanSniffer output.
Singling out Values with Filters:
If you would like to single out the throttle value then click the terminal window and press -000000 followed by the Enter key which will clear out all of the values scrolling. Then press +244 followed by the Enter key which will add back the throttle ID. You can now click the controller again and increase the speed with your Up arrow button without all the noise clouding your view.You will instead as shown below only have ID 244 in your output:
To get back all of the IDs again click the terminal window and input +000000 followed by the Enter key. Now you should see all of the output as before.Essentially 000000 means include everything. But when you put a minus in front of it then it negates everything and clears your terminal window filtering out all values.
Determine Blinker ID:
Now lets figure out another ID for the blinkers. If you hit the left or right arrow with the controls window selected you will notice a whole new ID appears in the list, ID 188 shown in the picture below which is associated with the blinker.
This ID was not listed before as it was not in use within the data output until you pressed the blinker control.Lets single this value out by pressing -000000 followed by +188. Just like in the throttle example your terminal should only show ID 188, initially it will show with 00 byte values.
As you press the left and the right blinker you will see the first Byte change from 00 to 01 or 02. If neither is pressed as in the screenshot above it will be 00. Its kind of hard to have the controller in focus and get a screenshot at the same time but the ID will remain visible as 00 until it times out and disappears from the list when not active. However with it filtered out as above you can get a better view of things and it wont disappear.
Time for YOU to do some Protocol Reversing:
This lab will give you a good idea how to reverse all of the functionality of the car and associate each action with the proper ID and BYTE. This way you can create a map of intended functionality changes you wish to make.Above we have done a few walk throughs with you on how to determine which byte and ID is associated with an action. Now its time to map everything out yourself with all the remaining functionality before moving on to attacking individual components.
Lab Work Suggestion:
Take out a piece of paper and a pencil
Try unlocking and locking doors and write down the ID which controls this action (remember your filters)
Try unlocking each door and write down the BYTES needed for each door to open
Try locking each doors and what Bytes change and what are their values, write them down
Do the same thing for the blinkers left and right (Might be different then what I did above)
What ID is the speedometer using?What byte changes the speed?
Attacking Functionality Directly:
With all of the functionality mapped out we can now try to target various devices in the network directly without interacting with the controllers GUI. Maybe we broke into the car via cellular OnStar connectionor the center console units BLE connection which was connected to the CAN network in some way. After an exploit we have direct access to the CAN network and we would like to perform actions. Or maybe you have installed a wireless device into an OBD2 port under the dashboard you have remote access to the automobile.
Using the data from the CAN network reversing lab above we can call these actions directly with the proper CAN-ID and Byte.Since we are remote to the target we can't just reach over and grab the steering wheel or hit the throttle we will instead send your CAN frame to make the change.
One way we can do this is via the CanSend utility. Lets take our information from our lab above and make the left turn signal flash with the following ID 188 for the turn signal by changing the first byte to 01 indicating the left signal is pressed. CanSend uses the format ID#Data. You will see this below when sending the turn signal via CanSend.
You should have noticed that the left signal flashed. If not pay more attention and give it another try or make sure you used the correct ID and changed the correct byte.So lets do the same thing with the throttle and try to set the speed to something with ID 244 that we determined was the throttle.
My guess is that nothing happened because its so fast the needle is not going to jump to that value. So instead lets try repeating this over and over again with a bash loop which simply says that while True keep sending the throttle value of 11 which equates to about 30mph:
ficti0n@ubuntu:~/Desktop/ICSim$ while true; do cansend vcan0 244#00000011F6;done
Yes thats much better, you may notice the needle jumping back and forth a bit. The reason the needle is bouncing back and forth is because the normal CAN traffic is sent telling the car its actually set to 00 in between your frames saying its 30mph.But it worked and you have now changed the speed the car sees and you have flashed the blinker without using the cars normal blinker controls. Pretty cool right?
Monitor the CAN Bus and react to it:
Another way to handle this issue is to monitor the CAN network and when it sees an ID sent it will automatically send the corresponding ID with a different value.. Lets give that a try to modify our speed output by monitoring for changes. Below we are simply running CanDump and parsing for ID 244 in the log output which is the throttle value that tells the car the speed. When a device in the car reports ID 244 and its value we will immediately resend our own value saying the speed is 30mph with the value 11.See below command and try this out.
ficti0n@ubuntu:~/Desktop/ICSim$ candump vcan0 | grep " 244 " | while read line; do cansend vcan0 244#00000011F6; done
With this running after a few seconds you will see the speed adjust to around 30MPH once it captures a legitimate CAN-ID 244 from the network traffic and sends its own value right after.
Ok cool, so now while the above command is still running click the controller window and start holding down the Up arrow with the controller in focus.. After a few seconds or so when the speed gets above 30MPH you will see the needle fighting for the real higher value and adjusting back to 30MPH as your command keeps sending its on value as a replacement to the real speed.
So thats one way of monitoring the network and reacting to what you see in a very crude manner.Maybe someone stole your car and you want to monitor for an open door and if they try to open the door it immediately locks them in.
Conclusion and whats next:
I am not an expert car hacker but I hope you enjoyed this. Thats about as far as I want to go into this subject today, in the next blog we will get into how to code python to perform actions on the CAN network to manipulate things in a similar way.With your own code you are not limited to the functionality of the tools you are provided and can do whatever you want. This is much more powerful then just using the CanUtils pre defined tools. Later on I will also get into the hardware side of things if you would like to try this on a real car where things are more complicated and things can go wrong.
Many Ways Of Malware Persistence (That You Were Always Afraid To Ask)
TL;DR: Are you into red teaming? Need persistence? This post is not that long, read it ;)
Are you into blue teaming? Have to find those pesky backdoors? This post is not that long, read it ;)
In the previous post, I listed different ways how a Windows domain/forest can be backdoored. In this new post, I am digging a bit deeper, and list the most common/known ways malware can survive a reboot, just using local resources of the infected Windows system. The list is far from complete, and I would like to encourage everyone to comment on new methods, not yet listed here.
From an incident response point of view, one of the best strategies to find malware on a suspicious system is to search for suspicious entries that start with the system. In the good old days, you had to check for 2-3 locations to cover 99% of the infections. Nowadays, there are a thousand ways malware can start. The common ones automatically start whenever Windows starts (or the user logs in), but some tricky ones are triggered by other events.
Autoruns
My favorite choice when it comes to malware persistence is Sysinternals tools, Autoruns. In this paragraph, I mainly quote the official built-in help, but bear with me, it is still interesting.
On a side note, there are some problems with the Autoruns tool: it can only run on a live system. (EDIT: This is not true, Autoruns can analyze offline systems as well! Thanks to a comment from Justin.) And usually, this is not the case - I usually have dd images. And although VBoxManage can convert the dd images to VirtualBox disk image format, usually I don't have the time and storage to do that. This is where xmount awesomeness is here to rescue the day. It can convert dd and Encase images on-the-fly in-memory to Virtualbox format. Just attach the disk image to a new Virtualbox machine as the main boot HDD, modify the CPU/disk/controller settings until Windows starts instead of crashing, and voila, you can boot your forensic image - without modifying a single bit on the original evidence dd file. Another problem with malware analysis on a live system is that a good rootkit can fool the analyst easily.
For quick wins, I usually filter out Microsoft entries, look for per-user locations only and check for unverified (missing or invalid Authenticode) executables. This usually helps to find 90% of malware easily. Especially if it has a color like purple or pink, it is highly suspicious. To find the rest, well, one has to dig deeper.
Zeus "hiding" in the usual random directory - check the faked timestamp
To implement "poor-mans monitoring", regularly save the output of Autoruns, and during incident response, it will be highly valuable. Howto guide here.
Logon
"This entry results in scans of standard autostart locations such as the Startup folder for the current user and all users, the Run Registry keys, and standard application launch locations."
There are 42 registry keys/folders at the moment in Autoruns, which can be used to autostart a malware. The most common ways are the HKCU\Software\Microsoft\Windows\CurrentVersion\Run and the C:\ProgramData\Microsoft\Windows\Start Menu\Programs\Startup folder.
One of my favorite regarding this topic is the file-less Poweliks malware, 100% pure awesomeness. Typical ring 3 code execution.
Explorer
"Select this entry to see Explorer shell extensions, browser helper objects, explorer toolbars, active setup executions, and shell execute hooks". 71 registry keys, OMG. Usually, this is not about auto-malware execution, but some of them might be a good place to hide malware.
Internet explorer
"This entry shows Browser Helper Objects (BHO's), Internet Explorer toolbars and extensions". 13 registry key here. If a malicious BHO is installed into your browser, you are pretty much screwed.
Scheduled tasks
"Task scheduler tasks configured to start at boot or logon." Not commonly used, but it is important to look at this.
I always thought this part of the autostart entries is quite boring, but nowadays, I think it is one of the best ways to hide your malware. There are so many entries here by default, and some of them can use quite good tricks to trigger the start.
HKLM\System\CurrentControlSet\Servicesis a very commonplace to hide malware, especially rootkits. Check all entries with special care.
Drivers
Same as services. Very commonplace for rootkits. Unfortunately, signing a driver for 64-bit systems is not fun anymore, as it has to be signed by certificates that can be chained back to "Software Publisher Certificates". Typical startup place for Ring 0 rootkits.
22 registry keys. Not very common, but possible code execution.
Boot execute
"Native images (as opposed to Windows images) that run early during the boot process."
5 registry keys here. Good place to hide a rootkit here.
Image hijacks
"Image file execution options and command prompt autostarts." 13 registry key here. I believe this was supposed for debugging purposes originally.
This is where the good-old sticky keys trick is hiding. It is a bit different from the others, as it provides a backdoor access, but you can only use this from the local network (usually). The trick is to execute your code whenever someone presses the SHIFT key multiple times before logging into RDP. The old way was to replace the sethc.exe, the new fun is to set a debug program on sethc.
If you see this, you are in trouble
AppInit
"This has Autoruns shows DLLs registered as application initialization DLLs." Only 3 registry keys here. This is the good old way to inject a malicious DLL into Explorer, browsers, etc. Luckily it is going to be deprecated soon.
Known DLLs
"This reports the location of DLLs that Windows loads into applications that reference them." Only 1 registry key. This might be used to hijack some system DLLs.
Winlogon
"Shows DLLs that register for Winlogon notification of logon events." 7 registry keys. Sometimes used by malware.
Winsock providers
"Shows registered Winsock protocols, including Winsock service providers. Malware often installs itself as a Winsock service provider because there are few tools that can remove them. Autoruns can disable them, but cannot delete them." 4 registry keys. AFAIK this was trendy a while ago. But still, a good place to hide malware.
Print monitors
"Displays DLLs that load into the print spooling service. Malware has used this support to autostart itself." 1 registry key. Some malware writers are quite creative when it comes to hiding their persistence module.
LSA providers
"Shows registers Local Security Authority (LSA) authentication, notification and security packages." 5 registry keys. A good place to hide your password stealer.
Network providers
"Missing documentation". If you have a good 1 sentence documentation, please comment.
WMI filters
"Missing documentation". Check Mandiant for details.
Sidebar gadgets
Thank god MS disabled this a while ago :)
We all miss you, you crappy resource gobble nightmares
Common ways - not in autoruns
Now, let's see other possibilities to start your malware, which won't be listed in Sysinternals Autoruns.
Backdoor an executable/DLL
Just change the code of an executable which is either auto-starting or commonly started by the user. To avoid lame mistakes, disable the update of the file ... The backdoor factory is a good source for this task. But if you backdoor an executable/DLL which is already in Autoruns listed, you will break the Digital Signature on the file. It is recommended to sign your executable, and if you can't afford to steal a trusted certificate, you can still import your own CA into the user's trusted certificate store (with user privileges), and it will look like a trusted one. Protip: Use "Microsoft Windows" as the codesigner CA, and your executable will blend in.
See, rootkit.exe totally looks legit, and it is filtered out when someone filters for "Hide Windows entries".
Hijack DLL load order
Just place your DLL into a directory which is searched before the original DLL is found, and PROFIT! But again, to avoid lame detection, be sure to proxy the legitimate function calls to the original DLL. A good source on this topic from Mandiant and DLL hijack detector.
Here you can see how PlugX works in action, by dropping a legitimate Kaspersky executable, and hijacking the DLL calls with their DLL.
Hijack a shortcut from the desktop/start menu
Never underestimate the power of lame tricks. Just create an executable which calls the original executable, and meanwhile starts your backdoor. Replace the link, PROFIT! And don't be a skiddie, check the icon ;) I have seen this trick in adware hijacking browsers a lot of times.
IE hijacked to start with http://tinyurl.com/2fcpre6
File association hijack
Choose the user's favorite file type, replace the program which handles the opening with a similar one described in the previous section, and voila!
COM object hijack
The main idea is that some COM objects are scanned for whether they are on the system or not, and when it is registered, it is automatically loaded. See COMpfun for details.
Windows Application Compatibility - SHIM
Not many people are familiar with Windows Application Compatibility and how it works. Think about it as an added layer between applications and the OS. If the application matches a certain condition (e.g. filename), certain actions will take place. E.g. emulation of directories, registry entries, DLL injection, etc. In my installation, there are 367 different compatibility fixes (type of compatibility "simulation"), and some of those can be customized.
Every time IE starts, inject a DLL into IE
Bootkits
Although bootkits shown here can end up in Autoruns in the drivers section (as they might need a driver at the end of the day), I still think it deserves a different section.
MBR - Master boot record
Malware can overwrite the Master boot record, start the boot process with its own code, and continue the boot process with the original one. It is common for rootkits to fake the content of the MBR record, and show the original contents. Which means one just have attached the infected HDD to a clean system, and compare the first 512 bytes (or more in some cases) with a known, clean state, or compare it to the contents shown from the infected OS. SecureBoot can be used to prevent malware infections like this.
There is a slight difference when MBR is viewed from infected OS vs clean OS
VBR - Volume boot record
This is the next logical step where malware can start it's process, and some malware/rootkit prefers to hide it's startup code here. Check GrayFish for details. SecureBoot can be used to prevent malware infections like this.
BIOS/UEFI malware
Both the old BIOS and the new UEFI can be modified in a way that malware starts even before the OS had a chance to run. Although UEFI was meant to be more secure than BIOS, implementation and design errors happens. Check the Computrace anti-theft rootkit for details.
Hypervisor - Ring -1 rootkit
This is somewhat special, because I believe although rootkit can run in this layer but it can't persist only in this layer on an average, physical machine, because it won't survive a reboot See Rutkowska's presentation from 2006 But because the hypervisor can intercept the restart event, it can write itself into one of the other layers (e.g. install a common kernel driver), and simply delete it after it is fully functional after reboot. Update: There is a good paper from Igor Korkin about hypervisor detection here.
SMM (System Management Mode) malware - Ring -2 rootkit
Intel® Active Management Technology - Ring -3 rootkit
According to Wikipedia, "Intel Active Management Technology (AMT) is hardware and firmware technology for remote out-of-band management of personal computers, in order to monitor, maintain, update, upgrade, and repair them". You can ask, what could possibly go wrong? See Alexander Tereshkin's and Rafal Wojtczuk's great research on this, or Vassilios Ververis thesis about AMT.
As not many people click on links, let me quote the scary stuff about AMT:
Independent of the main CPU
Can access host memory via DMA (with restrictions)
Dedicated link to NIC, and its filtering capabilities
Can force host OS to reboot at any time (and boot the system from the emulated CDROM)
Active even in S3 sleep!
Other stuff
Create new user, update existing user, hidden admins
Sometimes one does not even have to add malicious code to the system, as valid user credentials are more than enough. Either existing users can be used for this purpose, or new ones can be created. E.g. a good trick is to use the Support account with a 500 RID - see here, Metasploit tool here.
Esoteric firmware malware
Almost any component in the computer runs with firmware, and by replacing the firmware with a malicious one, it is possible to start the malware. E.g. HDD firmware (see GrayFish again), graphic card, etc.
Hidden boot device
Malware can hide in one of the boot devices which are checked before the average OS is loaded, and after the malware is loaded, it can load the victim OS.
Network-level backdoor
Think about the following scenario: every time the OS boots, it loads additional data from the network. It can check for new software updates, configuration updates, etc. Whenever a vulnerable software/configuration update, the malware injects itself into the response, and get's executed. I know, this level of persistence is not foolproof, but still, possible. Think about the recently discovered GPO MiTM attack, the Evilgrade tool, or even the Xensploit tool when we are talking about VM migration.
Software vulnerability
Almost any kind of software vulnerability can be used as a persistent backdoor. Especially, if the vulnerability can be accessed remotely via the network, without any user interaction. Good old MS08-067...
Hardware malware, built into the chipset
I am not sure what to write here. Ask your local spy agency for further information. Good luck finding those!
Web Hacking Video Series #4 MySQL Part 2 (Injection And Coding)
Video Lesson Topics:
Setting up your victim application, databases and lab
Attacking a simple injection with information Schema
Automating your injections with python and beautiful soup
Dealing with various web encoding in Python and PHP
Bypassing LoadFile Size restrictions and automating it
Decrypting sensitive data via PHP and Python interactions
As always me rambling about stupid nonsense :P FTW
Part 2 of Mysql covers the topic of injecting a simple SQL injection example. Starts out slow then combines techniques and moves into more advanced topics. Prior to attempting this lesson make sure you have watched the videos in the previous blog or understand both SQL and basic python coding. I will show how to automate the injection process via python utilizing simple HTML processing abilities of beautiful soup. I will cover many python libraries for encoding data and calling web based applications. I also talk about how to deal with encrypted data and methods of enumerating files and folders looking for possible implementation issues and attack points to decrypt sensitive data via PHP/Python interaction with whats available on the server. This is the 2nd part of a 3 part series on MySQL for attacking web applications.
CEH: System Hacking, Cracking A Password, Understanding The LAN Manager Hash, NetBIOS DoS Attacks
Passwords are the key element of information require to access the system. Similarly, the first step is to access the system is that you should know how to crack the password of the target system. There is a fact that users selects passwords that are easy to guess. Once a password is guessed or cracked, it can be the launching point for escalating privileges, executing applications, hiding files, and covering tracks. If guessing a password fails, then passwords may be cracked manually or with automated tools such as a dictionary or brute-force method.
Cracking a Password
Passwords are stored in the Security Accounts Manager (SAM) file on a Windows system and in a password shadow file on a Linux system.
Manual password cracking involves attempting to log on with different passwords. The hacker follows these steps:
Find a valid user account (such as Administrator or Guest).
Create a list of possible passwords.
Rank the passwords from high to low probability.
Key in each password.
Try again until a successful password is found.
A hacker can also create a script file that tries each password in a list. This is still considered manual cracking, but it's time consuming and not usually effective.
A more efficient way of cracking a password is to gain access to the password file on a system. Most systems hash (one-way encrypt) a password for storage on a system. During the logon process, the password entered by the user is hashed using the same algorithm and then compared to the hashed passwords stored in the file. A hacker can attempt to gain access to the hashing algorithm stored on the server instead of trying to guess or otherwise identify the password. If the hacker is successful, they can decrypt the passwords stored on the server.
Understanding the LAN Manager Hash
Windows 2000 uses NT LAN Manager (NTLM) hashing to secure passwords in transit on the network. Depending on the password, NTLM hashing can be weak and easy to break. For example, let's say that the password is 123456abcdef . When this password is encrypted with the NTLM algorithm, it's first converted to all uppercase: 123456ABCDEF . The password is padded with null (blank) characters to make it 14 characters long: 123456ABCDEF__ . Before the password is encrypted, the 14-character string is split in half: 123456A and BCDEF__ . Each string is individually encrypted, and the results are concatenated:
The SAM file in Windows contains the usernames and hashed passwords. It's located in the Windows\system32\config directory. The file is locked when the operating system is running so that a hacker can't attempt to copy the file while the machine is booted to Windows.
One option for copying the SAM file is to boot to an alternate operating system such as DOS or Linux with a boot CD. Alternately, the file can be copied from the repair directory. If a system administrator uses the RDISK feature of Windows to back up the system, then a compressed copy of the SAM file called SAM._ is created in C:\windows\repair . To expand this file, use the following command at the command prompt:
C:\>expand sam._ sam
After the file is uncompressed, a dictionary, hybrid, or brute-force attack can be run against the SAM file using a tool like L0phtCrack. A similar tool to L0phtcrack is Ophcrack.
Download and install ophcrack from http://ophcrack.sourceforge.net/
Redirecting the SMB Logon to the Attacker
Another way to discover passwords on a network is to redirect the Server Message Block (SMB) logon to an attacker's computer so that the passwords are sent to the hacker. In order to do this, the hacker must sniff the NTLM responses from the authentication server and trick the victim into attempting Windows authentication with the attacker's computer.
A common technique is to send the victim an email message with an embedded link to a fraudulent SMB server. When the link is clicked, the user unwittingly sends their credentials over the network.
SMBRelay
An SMB server that captures usernames and password hashes from incoming SMB traffic. SMBRelay can also perform man-in-the-middle (MITM) attacks.
SMBRelay2
Similar to SMBRelay but uses NetBIOS names instead of IP addresses to capture usernames and passwords.
pwdump2
A program that extracts the password hashes from a SAM file on a Windows system. The extracted password hashes can then be run through L0phtCrack to break the passwords.
Samdump
Another program that extracts NTLM hashed passwords from a SAM file.
C2MYAZZ
A spyware program that makes Windows clients send their passwords as clear text. It displays usernames and their passwords as users attach to server resources.
NetBIOS DoS Attacks
A NetBIOS denial-of-service (DoS) attack sends a NetBIOS Name Release message to the NetBIOS Name Service on a target Windows systems and forces the system to place its name in conflict so that the name can no longer be used. This essentially blocks the client from participating in the NetBIOS network and creates a network DoS for that system.
Start with a memorable phrase, such as "Maryhadalittlelamb"
Change every other character to uppercase, resulting in "MaRyHaDaLiTtLeLaMb"
Change a to @ and i to 1 to yield "M@RyH@D@L1TtLeL@Mb"
Drop every other pair to result in a secure repeatable password or "M@H@L1LeMb"
Now you have a password that meets all the requirements, yet can be "remade" if necessary.More articles
DOS (Denial Of Service) Attack Tutorial Ping Of Death ;DDOS
What is DoS Attack?
DOS is an attack used to deny legitimate users access to a resource such as accessing a website, network, emails, etc. or making it extremely slow. DoS is the acronym for Denial of Service. This type of attack is usually implemented by hitting the target resource such as a web server with too many requests at the same time. This results in the server failing to respond to all the requests. The effect of this can either be crashing the servers or slowing them down.
Cutting off some business from the internet can lead to significant loss of business or money. The internet and computer networks power a lot of businesses. Some organizations such as payment gateways, e-commerce sites entirely depend on the internet to do business.
In this tutorial, we will introduce you to what denial of service attack is, how it is performed and how you can protect against such attacks.
DoS– this type of attack is performed by a single host
Distributed DoS– this type of attack is performed by a number of compromised machines that all target the same victim. It floods the network with data packets.
How DoS attacks work
Let's look at how DoS attacks are performed and the techniques used. We will look at five common types of attacks.
Ping of Death
The ping command is usually used to test the availability of a network resource. It works by sending small data packets to the network resource. The ping of death takes advantage of this and sends data packets above the maximum limit (65,536 bytes) that TCP/IP allows. TCP/IP fragmentation breaks the packets into small chunks that are sent to the server. Since the sent data packages are larger than what the server can handle, the server can freeze, reboot, or crash.
Smurf
This type of attack uses large amounts of Internet Control Message Protocol (ICMP) ping traffic target at an Internet Broadcast Address. The reply IP address is spoofed to that of the intended victim. All the replies are sent to the victim instead of the IP used for the pings. Since a single Internet Broadcast Address can support a maximum of 255 hosts, a smurf attack amplifies a single ping 255 times. The effect of this is slowing down the network to a point where it is impossible to use it.
Buffer overflow
A buffer is a temporal storage location in RAM that is used to hold data so that the CPU can manipulate it before writing it back to the disc. Buffers have a size limit. This type of attack loads the buffer with more data that it can hold. This causes the buffer to overflow and corrupt the data it holds. An example of a buffer overflow is sending emails with file names that have 256 characters.
Teardrop
This type of attack uses larger data packets. TCP/IP breaks them into fragments that are assembled on the receiving host. The attacker manipulates the packets as they are sent so that they overlap each other. This can cause the intended victim to crash as it tries to re-assemble the packets.
SYN attack
SYN is a short form for Synchronize. This type of attack takes advantage of the three-way handshake to establish communication using TCP. SYN attack works by flooding the victim with incomplete SYN messages. This causes the victim machine to allocate memory resources that are never used and deny access to legitimate users.
DoS attack tools
The following are some of the tools that can be used to perform DoS attacks.
Nemesy– this tool can be used to generate random packets. It works on windows. This tool can be downloaded from http://packetstormsecurity.com/files/25599/nemesy13.zip.html . Due to the nature of the program, if you have an antivirus, it will most likely be detected as a virus.
Land and LaTierra– this tool can be used for IP spoofing and opening TCP connections
Panther- this tool can be used to flood a victim's network with UDP packets.
Botnets– these are multitudes of compromised computers on the Internet that can be used to perform a distributed denial of service attack.
DoS Protection: Prevent an attack
An organization can adopt the following policy to protect itself against Denial of Service attacks.
Attacks such as SYN flooding take advantage of bugs in the operating system. Installing security patches can help reduce the chances of such attacks.
Intrusion detection systems can also be used to identify and even stop illegal activities
Firewalls can be used to stop simple DoS attacks by blocking all traffic coming from an attacker by identifying his IP.
Routers can be configured via the Access Control List to limit access to the network and drop suspected illegal traffic.
Hacking Activity: Ping of Death
We will assume you are using Windows for this exercise. We will also assume that you have at least two computers that are on the same network. DOS attacks are illegal on networks that you are not authorized to do so. This is why you will need to setup your own network for this exercise.
Open the command prompt on the target computer
Enter the command ipconfig. You will get results similar to the ones shown below
For this example, we are using Mobile Broadband connection details. Take note of the IP address. Note: for this example to be more effective, and you must use a LAN network.
Switch to the computer that you want to use for the attack and open the command prompt
We will ping our victim computer with infinite data packets of 65500
Enter the following command
ping 10.128.131.108 –t |65500
HERE,
"ping" sends the data packets to the victim
"10.128.131.108" is the IP address of the victim
"-t" means the data packets should be sent until the program is stopped
"-l" specifies the data load to be sent to the victim
You will get results similar to the ones shown below
Flooding the target computer with data packets doesn't have much effect on the victim. In order for the attack to be more effective, you should attack the target computer with pings from more than one computer.
The above attack can be used to attacker routers, web servers etc.
If you want to see the effects of the attack on the target computer, you can open the task manager and view the network activities.
Right click on the taskbar
Select start task manager
Click on the network tab
You will get results similar to the following
If the attack is successful, you should be able to see increased network activities.
Hacking Activity: Launch a DOS attack
In this practical scenario, we are going to use Nemesy to generate data packets and flood the target computer, router or server.
As stated above, Nemesy will be detected as an illegal program by your anti-virus. You will have to disable the anti-virus for this exercise.
Enter the target IP address, in this example; we have used the target IP we used in the above example.
HERE,
0 as the number of packets means infinity. You can set it to the desired number if you do not want to send, infinity data packets
The size field specifies the data bytes to be sent and the delay specifies the time interval in milliseconds.
Click on send button
You should be able to see the following results
The title bar will show you the number of packets sent
Click on halt button to stop the program from sending data packets.
You can monitor the task manager of the target computer to see the network activities.
Summary
A denial of service attack's intent is to deny legitimate users access to a resource such as a network, server etc.
There are two types of attacks, denial of service and distributed denial of service.
A denial of service attack can be carried out using SYN Flooding, Ping of Death, Teardrop, Smurf or buffer overflow
Security patches for operating systems, router configuration, firewalls and intrusion detection systems can be used to protect against denial of service attacks.


 Attacks")
 Attacks")
 Attacks")
 Attacks")
 Attacks")
 Attacks")
