Make Money Online Instantly - Your One Stop Resource For "Make Money Online Instantly"
Monday, April 13, 2020
Web-fu - The Ultimate Web Hacking Chrome Extension
Web-fu Is a web hacking tool focused on discovering and exploiting web vulnerabilitites.
BROWSER INTEGRATION
This tool has many advantages, as a browser-embedded webhacking tool, is very useful for scanning browser-authenticated applications, if browser can authenticate and access to the web application, the tool also can. Note that some other tools do not support neither certificate authentication nor web vpn accesses. The integration with chrome, provides a more comfortable and agile way of web-hacking, and you have all the application data loaded on the hacking tool, you don't need to copy the url, cookies, etc. to the tool, just right click and hack. The browser rendering engine is also used in this tool, to draw the html of the responses.
FALSES POSITIVES
When I coded this tool, I was obsessed with false positives, which is the main problem in all detection tools. I have implemented a gauss algorithm, to reduce the faslse positives automatically which works very very well, and save a lot of time to the pentester.
VIDEO
Here is a video, with some of the web-fu functionalitites:
VISUAL FEATURES
This tool has a visual crawler. Normal crawlers doesn't parse the ajvascript, this tool does. The visual crawler loads each link of the web site, rendering the html and executing all the javascript as a normal load, then the links are processed from he DOM and clicked. A visual form cracker, is also available, althow is experimental and only works on some kind of forms.
SCANNING FEATURES
The web-fu's portscanner, has a database of a common web ports, like 80,81,8080 and so on. The cracker module, can bruteforce web directories to find new attack vectors, and can fuzz get and post parameters for discovering vulns, and also crack passwords. There are 9 preloaded wordlists, and you can also load a custom wordlist. Prefilters, falsepositive reductor and render will be helpful. The scanners support SSL, if the website can be loaded in the chrome, can be scanned by web-fu.
ENCODERS & DECODERS
The supported encoders and decoders are: base64, urlescape and urlencode
OTHER FEATURES A web notepad is available, saving the information on the browser localStorage, there is one notepad per site. A cookie editor is also very useful for pentesting. The inteceptor, is like a web proxy but from the inside of the browser, you can intercept a request There is also a session locker and a exploit web search.
CHROME STORE Here is the link to the chrome store, the prize is about one euro, very cheap if you compare with other scanners: Web-Fu on Chrome Store
With webfu, you will do the best web site pentest and vulnerability assessment.
Blockchain Exploitation Labs - Part 3 Exploiting Integer Overflows And Underflows
In part 1 and 2 we covered re-entrancy and authorization attack scenarios within the Ethereum smart contract environment. In this blog we will cover integer attacks against blockchain decentralized applications (DAPs) coded in Solidity.
Integer Attack Explanation:
An integer overflow and underflow happens when a check on a value is used with an unsigned integer, which either adds or subtracts beyond the limits the variable can hold. If you remember back to your computer science class each variable type can hold up to a certain value length. You will also remember some variable types only hold positive numbers while others hold positive and negative numbers.
If you go outside of the constraints of the number type you are using it may handle things in different ways such as an error condition or perhaps cutting the number off at the maximum or minimum value.
In the Solidity language for Ethereum when we reach values past what our variable can hold it in turn wraps back around to a number it understands. So for example if we have a variable that can only hold a 2 digit number when we hit 99 and go past it, we will end up with 00. Inversely if we had 00 and we subtracted 1 we would end up with 99.
Normally in your math class the following would be true:
99 + 1 = 100 00 - 1 = -1
In solidity with unsigned numbers the following is true: 99 + 1 = 00 00 - 1 = 99
So the issue lies with the assumption that a number will fail or provide a correct value in mathematical calculations when indeed it does not. So comparing a variable with a require statement is not sufficiently accurate after performing a mathematical operation that does not check for safe values.
That comparison may very well be comparing the output of an over/under flowed value and be completely meaningless. The Require statement may return true, but not based on the actual intended mathematical value. This in turn will lead to an action performed which is beneficial to the attacker for example checking a low value required for a funds validation but then receiving a very high value sent to the attacker after the initial check. Lets go through a few examples.
Simple Example:
Lets say we have the following Require check as an example: require(balance - withdraw_amount > 0) ;
Now the above statement seems reasonable, if the users balance minus the withdrawal amount is less than 0 then obviously they don't have the money for this transaction correct?
This transaction should fail and produce an error because not enough funds are held within the account for the transaction. But what if we have 5 dollars and we withdraw 6 dollars using the scenario above where we can hold 2 digits with an unsigned integer?
Let's do some math. 5 - 6 = 99
Last I checked 99 is greater than 0 which poses an interesting problem. Our check says we are good to go, but our account balance isn't large enough to cover the transaction. The check will pass because the underflow creates the wrong value which is greater than 0 and more funds then the user has will be transferred out of the account.
Because the following math returns true: require(99 > 0)
Withdraw Function Vulnerable to an UnderFlow:
The below example snippet of code illustrates a withdraw function with an underflow vulnerability:
In this example the require line checks that the balance is greater then 0 after subtracting the _amount but if the _amount is greater than the balance it will underflow to a value above 0 even though it should fail with a negative number as its true value.
require(balances[msg.sender] - _amount > 0);
It will then send the value of the _amount variable to the recipient without any further checks:
msg.sender.transfer(_amount);
Followed by possibly increasing the value of the senders account with an underflow condition even though it should have been reduced:
balances[msg.sender] -= _amount;
Depending how the Require check and transfer functions are coded the attacker may not lose any funds at all but be able to transfer out large sums of money to other accounts under his control simply by underflowing the require statements which checks the account balance before transferring funds each time.
Transfer Function Vulnerable to a Batch Overflow:
Overflow conditions often happen in situations where you are sending a batched amount of values to recipients. If you are doing an airdrop and have 200 users who are each receiving a large sum of tokens but you check the total sum of all users tokens against the total funds it may trigger an overflow. The logic would compare a smaller value to the total tokens and think you have enough to cover the transaction for example if your integer can only hold 5 digits in length or 00,000 what would happen in the below scenario?
You have 10,000 tokens in your account You are sending 200 users 499 tokens each Your total sent is 200*499 or 99,800
The above scenario would fail as it should since we have 10,000 tokens and want to send a total of 99,800. But what if we send 500 tokens each? Lets do some more math and see how that changes the outcome.
You have 10,000 tokens in your account You are sending 200 users 500 tokens each Your total sent is 200*500 or 100,000 New total is actually 0
This new scenario produces a total that is actually 0 even though each users amount is 500 tokens which may cause issues if a require statement is not handled with safe functions which stop an overflow of a require statement.
Lets take our new numbers and plug them into the below code and see what happens:
1: The total variable is 100,000 which becomes 0 due to the 5 digit limit overflow when a 6th digit is hit at 99,999 + 1 = 0. So total now becomes 0.
2: This line checks if the users balance is high enough to cover the total value to be sent which in this case is 0 so 10,000 is more then enough to cover a 0 total and this check passes due to the overflow.
3: This line deducts the total from the senders balance which does nothing since the total of 10,000 - 0 is 10,000. The sender has lost no funds.
4-5: This loop iterates over the 200 users who each get 500 tokens and updates the balances of each user individually using the real value of 500 as this does not trigger an overflow condition. Thus sending out 100,000 tokens without reducing the senders balance or triggering an error due to lack of funds. Essentially creating tokens out of thin air.
In this scenario the user retained all of their tokens but was able to distribute 100k tokens across 200 users regardless if they had the proper funds to do so.
Lab Follow Along Time:
We went through what might have been an overwhelming amount of concepts in this chapter regarding over/underflow scenarios now lets do an example lab in the video below to illustrate this point and get a little hands on experience reviewing, writing and exploiting smart contracts. Also note in the blockchain youtube playlist we cover the same concepts from above if you need to hear them rather then read them.
For this lab we will use the Remix browser environment with the current solidity version as of this writing 0.5.12. You can easily adjust the compiler version on Remix to this version as versions update and change frequently. https://remix.ethereum.org/
Below is a video going through coding your own vulnerable smart contract, the video following that goes through exploiting the code you create and the videos prior to that cover the concepts we covered above:
This next video walks through exploiting the code above, preferably hand coded by you into the remix environment. As the best way to learn is to code it yourself and understand each piece:
Conclusion:
We covered a lot of information at this point and the video series playlist associated with this blog series has additional information and walk throughs. Also other videos as always will be added to this playlist including fixing integer overflows in the code and attacking an actual live Decentralized Blockchain Application. So check out those videos as they are dropped and the current ones, sit back and watch and re-enforce the concepts you learned in this blog and in the previous lab. This is an example from a full set of labs as part of a more comprehensive exploitation course we have been working on.
"snmpcheck is a free open source utility to get information via SNMP protocols. It works fine against Windows, Linux, Cisco, HP-UX, SunOS systems and any devices with SNMP protocol support. It could be useful for penetration testing or systems monitoring. snmpcheck has been tested on GNU/Linux, *BSD, Windows systems and Cygwin. snmpcheck is distributed under GPL license and based on Athena-2k script by jshaw. " read more...
Advantage of Ethical Hacking Hacking is quite useful in the following purpose- 1-To recover lost information, especially in case you lost your password. 2-To perform penetration testing to strengthen computer and network security.
3-To put adequate preventative measure in place to prevent security breaches. 4-To have a computer system that prevents malicious hackers from gaining access.
5-Fighting against terrorism and national security breaches.
Mythbusters: Is An Open (Unencrypted) WiFi More Dangerous Than A WPA2-PSK? Actually, It Is Not.
Introduction
Whenever security professionals recommend the 5 most important IT security practices to average users, one of the items is usually something like: "Avoid using open Wifi" or "Always use VPN while using open WiFi" or "Avoid sensitive websites (e.g. online banking) while using open WiFI", etc.
What I think about this? It is bullshit. But let's not jump to the conclusions. Let's analyze all risks and factors here.
During the following analysis, I made two assumptions. The first one is that we are comparing public WiFi hotspots with no encryption at all (referred to as Open), and we compare this to public WiFi hotspots with WPA2-PSK (and just hope WEP died years before). The other assumption is there are people who are security-aware, and those who just don't care. They just want to browse the web, access Facebook, write e-mails, etc.
The risks
Let's discuss the different threats people face using public hotspots, compared to home/work internet usage:
1.Where the website session data is not protected with SSL/TLS (and the cookie is not protected with secure flag), attackers on the same hotspot can obtain the session data and use it in session/login credentials stealing. Typical protocols affected:
HTTP sites
HTTPS sites but unsecured cookie
FTP without encryption
IMAP/SMTP/POP3 without SSL/TLS or STARTTLS
2.Attackers can inject extra data into the HTTP traffic, which can be used for exploits, or social engineer attacks (e.g. update Flash player with our malware) – see the Dark Hotel campaign
3.Attackers can use tools like SSLStrip to keep the user's traffic on clear text HTTP and steal password/session data/personal information
4.Attackers can monitor and track user activity
5.Attackers can directly attack the user's machine (e.g. SMB service)
WPA2-PSK security
So, why is a public WPA2-PSK WiFi safer than an open WiFi? Spoiler alert: it is not!
In a generic public WPA2-PSK scenario, all users share the same password. And guess what, the whole traffic can be decrypted with the following information: SSID + shared password + information from the 4-way handshake. https://wiki.wireshark.org/HowToDecrypt802.11
If you want to see it in action, here is a nice tutorial for you
Any user having access to the same WPA2-PSK network knows this information. So they can instantly decrypt your traffic. Or the attackers can just set up an access point with the same SSID, same password, and stronger signal. And now, the attacker can instantly launch active man-in-the-middle attacks. It is a common belief (even among ITSEC experts) that WPA2-PSK is not vulnerable to this attack. I am not sure why this vulnerability was left in the protocol, if you have the answer, let me know. Edit (2015-08-03): I think the key message here is that without server authentication (e.g. via PKI), it is not possible to solve this.
Let me link here one of my previous posts here with a great skiddie tool:
Decrypt all HTTP/FTP/IMAP/SMTP/POP3 passwords or other sensitive information
Can launch active attacks like SSLStrip, or modify HTTP traffic to include exploit/social engineer attacks
Can monitor/track user activity
The only difference between open and WPA2-PSK networks is that an open network can be hacked with an attacker of the skill level of 1 from 10, while the WPA2-PSK network needs and an attacker with a skill level of 1.5. That is the difference.
The real solutions
1.Website owners, service providers should deploy proper (trusted) SSL/TLS infrastructure, protect session cookies, etc. Whenever a user (or security professional) notices a problem with the quality of the service (e.g. missing SSL/TLS), the service provider has to be notified. If no change is made, it is recommended to drop the service provider and choose a more secure one. Users have to use HTTPS Everywhere plugin.
2.Protect the device against exploits by patching the software on it, use a secure browser (Chrome, IE11 + enhanced protection), disable unnecessary plugins (Java, Flash, Silverlight), or at least use it via click-to-play. Also, the use of exploit mitigations tools (EMET, HitmanPro Alert, Malwarebytes AntiExploit) and a good internet security suite is a good idea.
3.Website owners have to deploy HSTS, and optionally include their site in an HSTS preload list
4.Don't click blindly on fake downloads (like fake Flash Player updates)
5.The benefits of a VPN is usually overestimated. A VPN provider is just another provider, like the hotspot provider, or the ISP. They can do the same malicious stuff (traffic injecting, traffic monitoring, user tracking). Especially when people use free VPNs. And "Average Joe" will choose a free VPN. Also, VPN connections tend to be disconnected, and almost none of the VPN providers provide fail secure VPNs. Also, for the price of a good VPN service you can buy a good data plan and use 4G/3G instead of low-quality public hotspots. But besides this, on mobile OSes (Android, iOS, etc.) I strongly recommend the use of VPN, because it is not practically feasible to know for users which app is using SSL/TLS and which is not.
6.Use a location-aware firewall, and whenever the network is not trusted, set it to a Public.
7.In a small-business/home environment, buy a WiFi router with guest WiFi access possibility, where the different passwords can be set to guest networks than used for the other.
Asking the question "Are you using open WiFi?", or "Do you do online banking on open WiFi?" are the wrong questions. The good questions are:
Do you trust the operator(s) of the network you are using?
Are the clients separated?
If clients are not separated, is it possible that there are people with malicious intent on the network?
Are you security-aware, and are you following the rules previously mentioned? If you do follow these rules, those will protect you on whatever network you are.
And call me an idiot, but I do online banking, e-shopping, and all the other sensitive stuff while I'm using open WiFi. And whenever I order pizza from an HTTP website, attackers can learn my address. Which is already in the phone book, on Facebook, and in every photo metadata I took with my smartphone about my cat and uploaded to the Internet (http://iknowwhereyourcatlives.com/).
Most articles and research publications are full of FUD about what people can learn from others. Maybe they are just outdated, maybe they are not. But it is totally safe to use Gmail on an open WiFi, no one will be able to read my e-mails.
PS: I know "Average Joe" won't find my blog post, won't start to read it, won't understand half I wrote. But even if they do, they won't patch their browser plugins, pay for a VPN, or check the session cookie. So they are doomed to fail. That's life. Deal with it.
Wafw00F: The Web Application Firewall Fingerprinting Tool
How does wafw00f work? To do its magic, WAFW00F does the following steps:
Sends a normal HTTP request and analyses the response; this identifies a number of WAF solutions.
If that is not successful, wafw00f sends a number of (potentially malicious) HTTP requests and uses simple logic to deduce which WAF it is.
If that is also not successful, wafw00f analyses the responses previously returned and uses another simple algorithm to guess if a WAF or security solution is actively responding to wafw00f's attacks.
For further details, check out the source code on EnableSecurity's main repository. What does it detect?WAFW00F can detect a number of firewalls, a list of which is as below: wafw00f's installation If you're using Debian-based distro, enter this commands to install wafw00f: sudo apt update && sudo apt install wafw00f But if you're using another Linux distro, enter these commands to install wafw00f:
How to use wafw00f? The basic usage is to pass an URL as an argument. Example:
Scanning TLS Server Configurations With Burp Suite
In this post, we present our new Burp Suite extension "TLS-Attacker". Using this extension penetration testers and security researchers can assess the security of TLS server configurations directly from within Burp Suite. The extension is based on the TLS-Attacker framework and the TLS-Scanner, both of which are developed by the Chair for Network and Data Security.
Thanks to the seamless integration of the TLS-Scanner into the BurpSuite, the penetration tester only needs to configure a single parameter: the host to be scanned. After clicking the Scan button, the extension runs the default checks and responds with a report that allows penetration testers to quickly determine potential issues in the server's TLS configuration. Basic tests check the supported cipher suites and protocol versions. In addition, several known attacks on TLS are automatically evaluated, including Bleichenbacher's attack, Padding Oracles, and Invalid Curve attacks.
Furthermore, the extension allows fine-tuning for the configuration of the underlying TLS-Scanner. The two parameters parallelProbes and overallThreads can be used to improve the scan performance (at the cost of increased network load and resource usage).
It is also possible to configure the granularity of the scan using Scan Detail and Danger Level. The level of detail contained in the returned scan report can also be controlled using the Report Detail setting.
Please refer to the GitHub repositories linked above for further details on configuration and usage of TLS-Scanner.
Scan History
If several hosts are scanned, the Scan History tab keeps track of the preformed scans and is a useful tool when comparing the results of subsequent scans.
Additional functions will follow in later versions
Currently, we are working on integrating an at-a-glance rating mechanism to allow for easily estimating the security of a scanned host's TLS configuration.
This is a combined work of Nurullah Erinola, Nils Engelbertz, David Herring, Juraj Somorovsky, Vladislav Mladenov, and Robert Merget. The research was supported by the European Commission through the FutureTrust project (grant 700542-Future-Trust-H2020-DS-2015-1).
[OFF TOPIC] This post is a very much unrelated to information security and malware.
However, it is still very much "Contagio" as it is a project for keeping stats for the coronavirus 2019-nCoV infections.
While there are a number of resources that post current daily stats, it is harder to find daily historical numbers going to the first known infection case that was recorded on December 1, 2019.
Feel free to export, download and use it for any purposes. If you decide to use it and want to let me know or have corrections, you can leave a comment or email (email address is in the profile).
Recovering Data From An Old Encrypted Time Machine Backup
Recovering data from a backup should be an easy thing to do. At least this is what you expect. Yesterday I had a problem which should have been easy to solve, but it was not. I hope this blog post can help others who face the same problem.
The problem
1. I had an encrypted Time Machine backup which was not used for months 2. This backup was not on an official Apple Time Capsule or on a USB HDD, but on a WD MyCloud NAS 3. I needed files from this backup 4. After running out of time I only had SSH access to the macOS, no GUI
The struggle
By default, Time Machine is one of the best and easiest backup solution I have seen. As long as you stick to the default use case, where you have one active backup disk, life is pink and happy. But this was not my case.
As always, I started to Google what shall I do. One of the first options recommended that I add the backup disk to Time Machine, and it will automagically show the backup snapshots from the old backup. Instead of this, it did not show the old snapshots but started to create a new backup. Panic button has been pressed, backup canceled, back to Google.
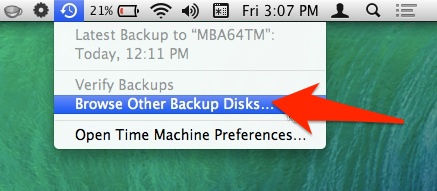
Other tutorials recommend to click on the Time Machine icon and pressing alt (Option) key, where I can choose "Browse other backup disks". But this did not list the old Time Machine backup. It did list the backup when selecting disks in Time Machine preferences, but I already tried and failed that way.
YAT (yet another tutorial) recommended to SSH into the NAS, and browse the backup disk, as it is just a simple directory where I can see all the files. But all the files inside where just a bunch of nonsense, no real directory structure.
YAT (yet another tutorial) recommended that I can just easily browse the content of the backup from the Finder by double-clicking on the sparse bundle file. After clicking on it, I can see the disk image on the left part of the Finder, attached as a new disk. Well, this is true, but because of some bug, when you connect to the Time Capsule, you don't see the sparse bundle file. And I got inconsistent results, for the WD NAS, double-clicking on the sparse bundle did nothing. For the Time Capsule, it did work. At this point, I had to leave the location where the backup was present, and I only had remote SSH access. You know, if you can't solve a problem, let's complicate things by restrict yourself in solutions. Finally, I tried to check out some data forensics blogs, and besides some expensive tools, I could find the solution.
The solution
Finally, a blog post provided the real solution - hdiutil. The best part of hdiutil is that you can provide the read-only flag to it. This can be very awesome when it comes to forensics acquisition.
Note: if you receive the error "resource temporarily unavailable", probably another machine is backing up to the device
And now, you can find your backup disk under /Volumes. Happy restoring!
Probably it would have been quicker to either enable the remote GUI, or to physically travel to the system and login locally, but that would spoil the fun.